| last updated 02/04/24 |
||
This page is
still under construction so please be patient with
us. We are uploading sections as soon as they are
finished. The pictures at the end of this page
showing construction details are the figures for the
missing sections. They are shown to help those who
are trying to finish an SSV before the text is
completed.
|
||
Welcome to the SSV Community Page
|
||
 |
||
|
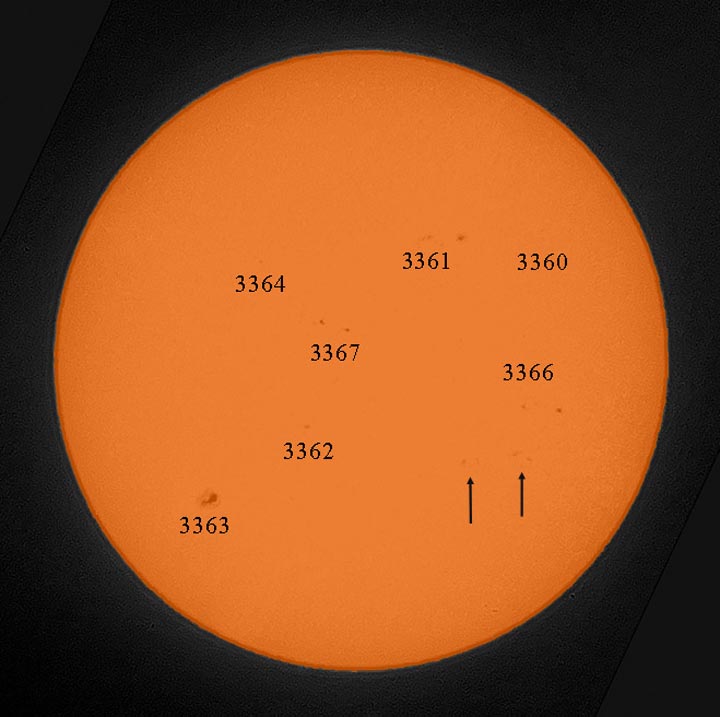
Figure 1. A smartphone photo of the solar image of a 2-lens SSV |
||
|
This SSV had a 52 mm x 600 mm objective and a −27 mm
focal length Barlow. The lenses cost $12.50 plus
shipping. The image was taken on July 9, 2023. The
original photo was black and white and the NASA SDO/HMI
continuum color was added in processing. |
||
|
Introduction
|
||
|
After the 2017 total solar eclipse, those of us in the
Eclipse Science Ambassador Program made an inventory of
everything learned from the workshops in which kids made
2-lens SSVs. Based on those lessons, we made
improvements to the SSV and simplified the construction.
The 2017 SSVs were 36 inches in length and had the
objective on a sled to adjust the sharpness of the solar
image. We find it better to have the projection screen
and objective on fixed supports with the Barlow on a
movable support in between them. We also increased the
screen separation to 40 inches, thus resulting in a
4-inch solar image with the current optics available. |
||
 |
||
|
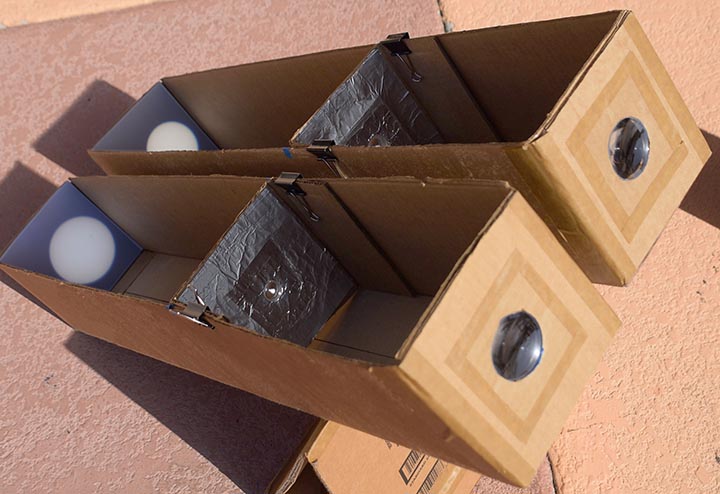
Figure 2. A pair of 2-lens SSVs side by side using the 2017 optics |
||
|
The upper viewer has a 50 mm x 500 mm objective while the lower one has the 38 mm x 500 mm objective. The image in the upper viewer is brighter because of the greater light gathering power of the the 50 mm lens. Both of these SSVs are made using a 40-inch Uline shipping box. The aluminum foil on the Barlow holder keeps the cardboard from being charred by the solar image if the light drifts off the Barlow lens. (Photograph by Bart Thomas) |
||
|
Things You Will Need
|
||
| |
This list shows what you will need to construct a 2-lens SSV identical to the ones we are now making.
|
|
|
Standard Shipping Boxes
|
||
|
In the 2017 eclipse workshops, the kids assembled
wooden SSVs from precut parts. That approach involved
considerable shop time before the workshops. Over 3600
holes of six different sizes had to be drilled in the
various parts for all the SSVs constructed in the
workshops as well as those given to teachers! That
drilling came after 780 wooden parts were cut from
sheets of half-inch plywood. There had to be an easier
way. Other companies sell similar products. We use the Uline boxes because they are made from sturdy cardboard and come in the sizes we find useful. The cost for the 40-inch box is $2.61 plus shipping with a minimum order of 25 boxes; however, if you are not conducting a workshop for a group, contact Uline customer service to order a few sample boxes. Alternately, if you can find a local business that uses these boxes see if you can obtain a few from them. If neither of those options work for you, then you could cut up boxes and glue together a result that would match the Uline box in size. That homemade box would make a fine SSV. Using a Uline box avoids a great deal of time spent measuring, cutting and gluing. Here is a link to a web page for making your own SSV boxes using various size cardboard boxes and scrap cardboard. Those with a shop could still make the SSV from wood scraps as many did for the 2017 eclipse. Our Barlow holder is also constructed from a Uline box.
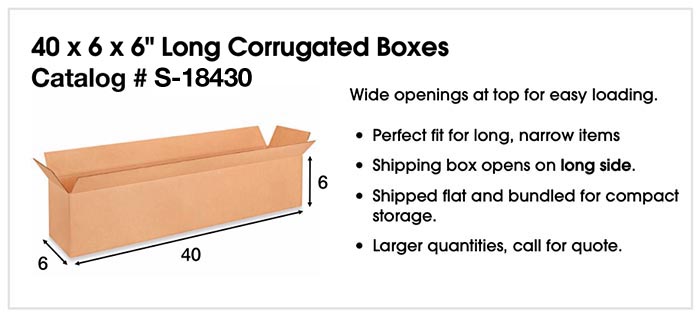
They offer a 6 x 6 x 12-inch box (Uline
Catalog # S-4128) for $0.61. We cut these boxes in
half and make two Barlow holders from each one. |
||
|
The Uline Box
|
||
 |
||
|
Figure 3. The Uline shipping box for
our 2-lens SSV |
||
|
Shipping Box Size
|
||
|
Bart Thomas has tested SSVs of various lengths using
objective diameters of about 50 mm. His tests found that
the lenses we suggest produce a solar image about 4-5
inches across (depending on the Barlow focal length) in
a 40-inch long box. That image size works well in a box
that is 6 x 6-inches on its end. He also found that the
solar image became too faint for easy viewing in longer
boxes that produced larger images and that is the reason
we have settled on the design show on these pages. If you desire a larger solar image, you will need to
make a longer SSV and also obtain an objective that has
a larger diameter. For larger images, we have designed
the large image safe solar viewer, LISSV
based on another Surplus Shed lens set with a larger
objective. |
||
|
Lenses for the 2-Lens SSV
|
||
|
There are now three choices at Surplus Shed for the
2-Lens SSV.
In a 40-inch SSV, all of these lens packages will produce about a 4-inch solar image with the 600 mm version producing a slightly larger image. Which one should you choose? The two achromats will show all but the smallest sunspots. In a recent side by side test, one SSV with the 52 mm x 600 mm objective in a Uline box performed as well as the solar projection device sold to schools for $500. The 600 mm focal length objective is our lens of choice. If you are making an SSV with your own lenses, we have
tested lenses from 325 mm to 600 mm focal length and
they work as objectives in a 40-inch SSV. Even longer
focal length lenses will do just fine but will require a
longer box. We have made several SSVs, with objectives
scavenged from cheap, discarded "hobby-killer"
refractors. If you want to use an objective lens with a
focal length greater than about 600 mm, plan on making
an SSV longer than in our instructions in order to have
an image size similar to ours. |
||
|
Type of Glue
|
||
|
As noted above, we are making 40-inch long SSVs using a
Uline cardboard shipping box. The boxes are shipped flat
and we glue them together to make the SSV. What glue
should you use? The answer is any glue that works for
you on paper products. We like the original Titebond
wood glue because it has good "grab" when parts are put
in contact. We have also used Titebond II when we were
out of the original Titebond. Both are a PVA glue
similar to school glue, the white glue that might
already be in many homes with school-aged children. A
good quality white glue works well. Remember, we are
gluing cardboard, so a thin application is all that is
necessary. For these water-based glues, you should use
weights or clamp the pieces for at least 20-30 minutes
before moving to the next step. |
||
|
The 15 Construction Steps
|
||
|
Below are the steps we follow in making the 2-Lens SSV.
Please note that when the text refers to the "front" of
the SSV, it means the face of the box holding the lens
and the "back" is the side holding the screen. Likewise
the "top" is the open side of the box and the "bottom"
is opposite the top. A Picture will be posted when it is
ready to be uploaded. |
||
|
1. |
The long flaps on what will be the open
side of the SSV are folded over and glued to the outside
of the box and clamped in place. See Figure 4 below. We
let the glue dry completely, usually for several hours.
You could simply cut them off but gluing them in this
fashion adds strength and helps the SSV hold its shape. |
|
 |
||
|
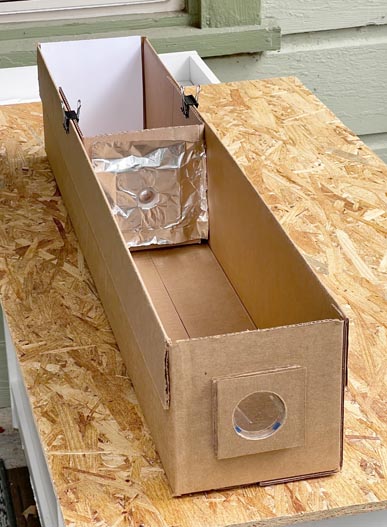
Figure 4. A finished 2-lens SSV showing the details of construction |
||
|
Notice the top flaps turned out and
glued to the outside. We find doing so makes the device
more robust. We also glue a length of hardboard (some
plywood world also work) to the bottom to add stability
and help the box keep its shape. The Barlow holder is
the part of the viewer held by binder clips with the
aluminum foil on the front. Sliding the holder back and
forth allows the solar image to be brought into sharp
focus. |
||
|
2. |
Next we decide which end of the box
will hold the screen and glue the short flap at that end
to the long bottom flaps. We use a carpenter's square or
similar tool to make the side that will hold the screen
square to the sides and bottom of the box. If you lack a
carpenter's square, then use the cover of a hardback
book. Also, a friend or neighbor with a table or
contractor's saw could easily make one from a small
piece of lumber or plywood. We use weights to hold the
short flap down until the glue has dried. |
|
|
3. |
Then we glue the flap on the other end
of the box and let weights hold that flap down until it
has dried. |
|
|
4. |
Now we glue a 6 x 40 inch piece of
hardboard to the bottom of the box. If you don't have
access to a saw, you could buy a 6-inch wide board from
a hardware or big-box store. A 36-inch length would work
yet it would be better to buy a 48-inch length and cut
it down. |
|
|
5. |
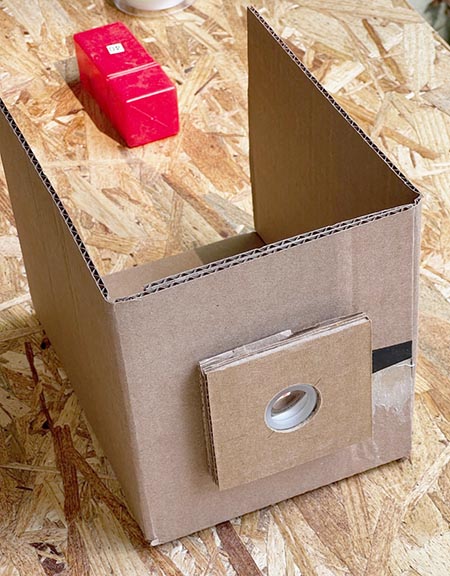
Next we make the Barlow holder either
from half of a 6 x 6 x 12-inch Uline box or gluing
together a box of the same size as shown in Figure 5
below. The idea here is to have a Barlow holder that
just fits in the SSV while holding the Barlow the same
distance from the bottom and sides of the SSV as the
objective. That way moving the holder forward and back
to adjust the sharpness of the image will keep the
Barlow lens aligned with the objective lens. |
|
 |
||
|
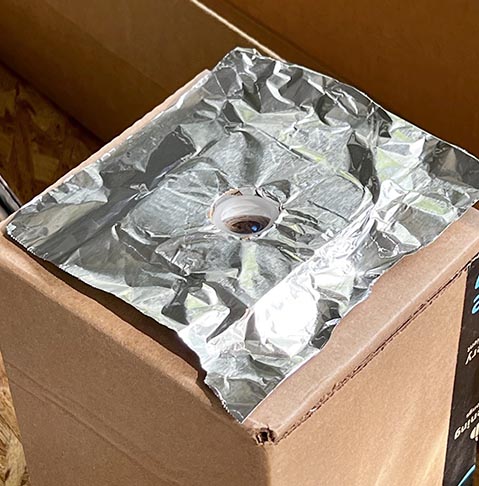
Figure 5. A finished Barlow holder minus the aluminum foil |
||
|
The foil keeps the concentrated light
from the objective from charring the cardboard. This
holder is constructed by gluing two box halves together
such that the holder just fits into the SSV with no
wiggle room. |
||
|
6. |
Then we mark the front of the SSV at
its center and use a t-pin or similar item to push a
hole through the center of the front end. We also hold
piece of cardboard the exact width of the inside of the
SSV against the SSV front and push the t-pin through it
as well.. This piece of cardboard is a template for
marking the position of the Barlow lens on the holder. |
|
|
7. |
Next we hold the cardboard template
against the front of the Barlow holder with a piece of
congregated cardboard under the template but not the
holder. This cardboard compensates for the flap glued
inside the front of the SSV. Then we put a t-pin in the
hole in the template and push it through the front of
the Barlow holder to indicate the center position of the
Barlow lens. |
|
|
8. |
After marking the position of the
lenses, we drill or cut holes for those lenses. Drilling
corrugated cardboard without tearing it is a difficult
task. For just one or two SSVs, marking the appropriate
sized circle and cutting the opening with an Exacto
knife or similar tool with a sharp blade is the best
approach. For making many SSVs, drilling is less
time consuming. We have had some success with freshly
sharpened Forstner bits, such as those from Freud. It
helps to use a drill press and to have a thin board with
a hole the size of the bit against the cardboard. The
other key to success is to drill from both sides of the
cardboard. Once the bit cuts through the top layer of
the cardboard, we move the bit to the other side and
resume drilling. The drill press cannot drill from the
backside of the SSV front so the guide board is
essential here. Forstner bits are expensive and we
discovered a better choice for drill bits. Cheap diamond
hole saws available from Amazon make a hole in
corrugated cardboard without tearing because they are
really wearing a hole in the cardboard. Two things are
helpful for the best results. Again a wooden drill bit
guide is useful and having cardboard rather than
something hard like wood on the backside gives us
excellent results. |
|
|
9. |
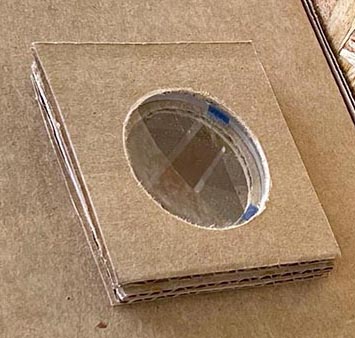
For both the front of the SSV and the
Barlow holder we drill a hole about 4-6 mm (about
¼-inch) smaller than the lens as a stop to prevent the
lens from falling out the back. Then we drill a hole the
same diameter as the lens in a stack of corrugated
cardboard the same thickness as the lens and an inch or
two larger than the lens diameter. See Figure 6. |
|
 |
||
|
Figure 6 The objective lens holder
made from a stack of cardboard |
||
|
10. |
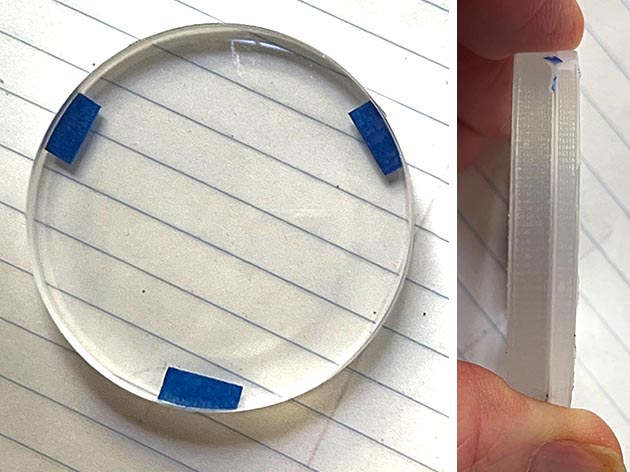
Now we prepare the two-part achromatic
lens for mounting. First we put three small pieces of
painter's tape on the edge of the thicker lens spaced
120° apart on its concave face (the side that is thinner
in the middle). These pieces of tape act as spacers.
Then we put the lenses together and run scotch magic
tape around the outside to keep them together. How do
the go together? The thinner lens has a flat face and a
convex face (bulging outward in the center). The flat
face is on the outside and faces the Sun. The convex
face fits against the thicker lens and they are kept
apart by the thickness of the painter's tape. See Figure
7. |
|
 |
||
|
Figure 7 A closeup of the front and side of the objective lens |
||
|
In the side view of the objective, the face of the lens pointing to the right will be on the outside of the SSV and point toward the sun. |
||
|
11. |
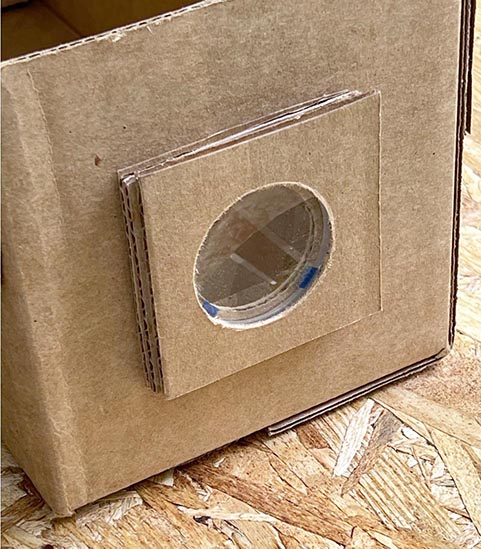
Next we fit the objective in the
cardboard mount made from a stack of cardboard sheets
glued together. We like the objective hole to be so
close in diameter to the objective that friction holds
the lens in place. If we can't match the sizes that
well, the we put the lens in the mount and glue quarter
inch wide pieces of cardboard or wood wedges to the lens
mount to hold the objective in place. After that glue
dries we glue the cardboard mount to the front of the
SSV centering it on the hole we put there. |
|
|
12. |
After that we install the Barlow in its
cardboard mount the same way we did the objective and
then glue the cardboard mount to the front of the Barlow
holder. To prevent the concentrated solar rays of the
objective from burning the cardboard, we install
aluminum foil around the lens on the Barlow holder using
double stick tape. |
|
We are still working on this page and some writing and editing is still needed. We will continue to update the work daily. The steps 13–15 below are merely an outline and we will upload the text as it is completed. |
||
|
13. |
install the screen in |
|
|
14. |
position the Barlow holder and test. |
|
|
15. |
Adjustments |
|
|
|
|
|
|
Some Additional Construction
Illustrations
|
||
 |
||
 |
||
 |
||
|
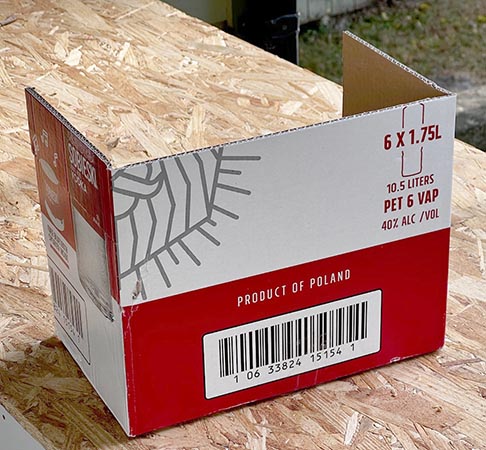
Making a Barlow holder begins with half
of a box at least as tall as the Uline box. |
||
 |
||
|
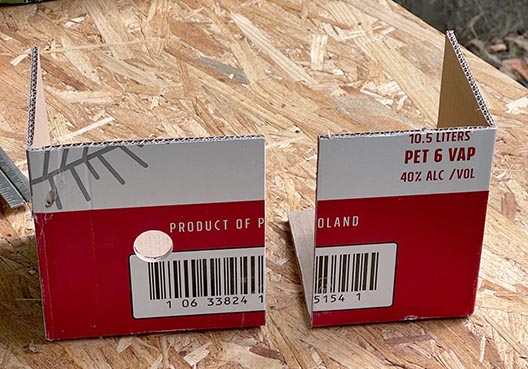
Next cut the height of the box to the
inside height of the Uline box or a little less. |
||
 |
||
|
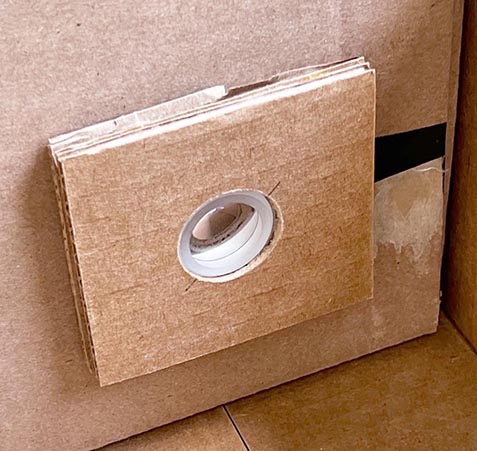
Next cut the width of the Barlow holder
to about ¼-inch less than the width of the inside of the
Uline box. Normally the hole for the Barlow lens is
drilled after the two pieces are joined, but the Barlow
holder was for a travel SSV and the front hole needed to
be drilled before they were joined. |
||
 |
||
|
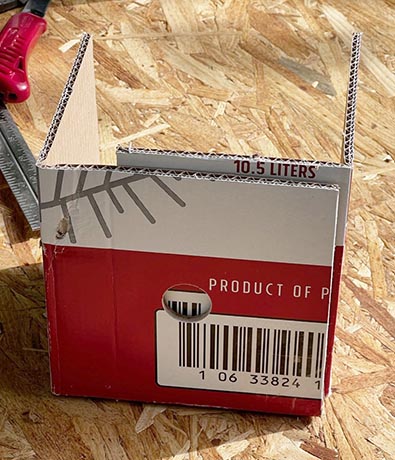
When the box is ready, both halves are
put into place in the SSV, clamped to the sides of the
box and glued so that the holder is a perfect fit to the
box. |
||
 |
||
|
The last step is to add some aluminum
foil to keep the image of the Sun formed by the
objective from burning the cardboard of the Barlow
holder.
|
||
| Back to the home page. |
||