The Safe Solar Viewer Community Page
for the 1-Lens SSV
|
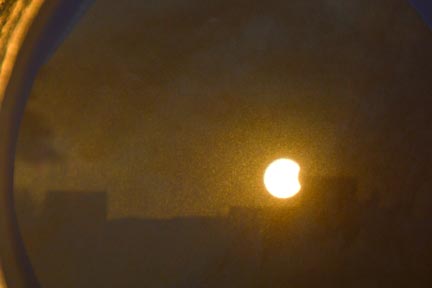
To the right is an image of an eclipse taken with
a 1-lens SSV. It shows the eclipsed Sun about to
set behind buildings along the horizon. This
viewer had the lens mounted on the end of a
cardboard tube with plain wax paper taped around
the other end and serving as a projection screen.
This viewer had a ½ diopter
lens making |
 |
|
an image 20 mm across. An image that size is
large for a 1-lens viewer and requires the
aparatus be quite long. The SSV used to make the
picture was over 6.5 feet in length. The
instructions below teach you how to make viewers
40 inches or less in length that produce images
from 5-10 mm across, a size large enough to see
the partial eclipse phases quite well. For less
than $1.00 and a modest amount of work, you can
make an SSV that is a signifcant improvement on
the pinhole viewer. |
|
Here you will find information on how to make a 1-lens SSV using a lens from ordinary reading glasses. Making one is so simple it could easily be constructed the day before an eclipse or even the hour before first contact. All that is needed is the right lens, some cardboard, glue and tape. It is a good project for youth groups because the lenses are inexpensive and cardboard boxes can be free.
It is surprisingly easy to make a 1-lens SSV. Take a pair
of reading glasses outside in the sunlight, cover one of
the lenses and let sunlight pass through the other lens.
You will notice it forms a spot of light on the ground.
Now move the lens either closer to or farther from the
ground until the spot is the smallest. There you are! The
spot is an image of the Sun and you have made a crude SSV.
I like the 1-lens SSV because it provides a brighter,
sharper image than the pinhole viewer at a very affordable
price. After you have gathered the materials, construction
takes a matter of minutes.
For the optics, obtain a lens from a pair of reading
glasses. We prefer a +1 or +1.25 diopter lens but anything
up to a +2 lens works although for the +2 lens the solar
image is half the size produced by the +1 diopter one;
however the SSV is half as long and easier for a young
child to deal with. We purchased our reading glasses from
Dollar Tree and the recent cost was a little over a
dollar. (A +1 close-up camera filter will work just as
well but usually cost more and they are less common today
that they used to be.) The +1 lenses have a focal length
of 1.0 meter (39.4 inches) and produce an image of the Sun
about 1 cm (0.4 inches) across. The +1.25 lenses Have a
focal length of 0.8 meters (31.5 inches) and produce an
image of the Sun about 0.8 cm (0.3 inches) across. Either
of these lenses produce images easily large enough to show
the partial phases of a solar eclipse very well. They are
not as well suited to show the eclipse to groups as the
2-lens SSV, but they make a fine personal viewer.
If you are working with a club or a scout group and
having children make these viewers, then we suggest you
order from Dollar Tree's web site where their reading
glasses are sold only in case quantities. The glasses with
plastic lenses come 36 to a case and thus hold lenses for
72 SSVs. Shipping to a Dollar Tree near you is free but
you can also have them shipped directly to you at a very
reasonable cost. (Note: neither the editor of this web
site nor the College of Charleston gain any financial
benefit from promoting Dollar Tree.)
The next step in making a 1-lens SSV is to obtain or make
a support long enough to hold the lens at one end and a
piece of white paper at the proper distance at the other
end. SSV Community members have made these supports of
wood, foam board and other materials but they are very
easy to make using cardboard boxes.
If you are helping a group of youngsters make 1-lens SSVs, constructing a large number of boxes is a time-consuming job. Also it requires more skill and patience than most children have, so having the kids make their own boxes seems impractical. In such cases we recommend using standard long shipping boxes of the appropriate length. Uline, a shipping supply company, has a number of suitable boxes of the right length for the job. In Table I we have listed the catalog number of a proper size Uline box for each different strength lens.
|
|
||||
| Lens Power (diopters) |
Focal Length (inches) |
Solar Image (inches) |
Uline Box (Inches) |
Uline Catalogue # |
|
|
||||
| 1.00 |
39.4 |
0.39 |
40 x 6 x 6 |
S-18430 |
| 1.25 |
31.5 |
0.31 |
32 x 6 x 6 |
S-4669 |
| 1.50 |
26.2 |
0.26 |
26 x 4 x 4 |
S-22696 |
| 1.75 |
22.5 |
0.22 |
22 x 4 x 4 |
S-4937 |
| 2.00 |
19.7 |
0.20 |
20 x 4 x 4 |
S-12601 |
|
|
||||
Uline does not have boxes identical in length to the
focal lengths of the lenses we are using, but those
discrepancies are all 2% or less and that is small enough
to be ignored, especially since we are stopping down the
size of the lens to an opening to no more than half an
inch or less across. Stopping down increases the "depth of
field" of the lens and allows quite a variation in focal
distance without decreasing sharpness. Those of you
familiar with the technical aspects of photography are
familiar with the effect.
Unfortunately for 32-inch and 40-inch SSVs Uline does not
offer boxes in a 4 x 4 option. A 6-inch box is bigger than
necessary but certainly will certainly do the job as well
as a narrower box.
If you are only constructing one or two SSVs then making
a box or two is a simple enough task. We find it best if
you find a longer box with a suitable dimension for the
width and cut it down to size.
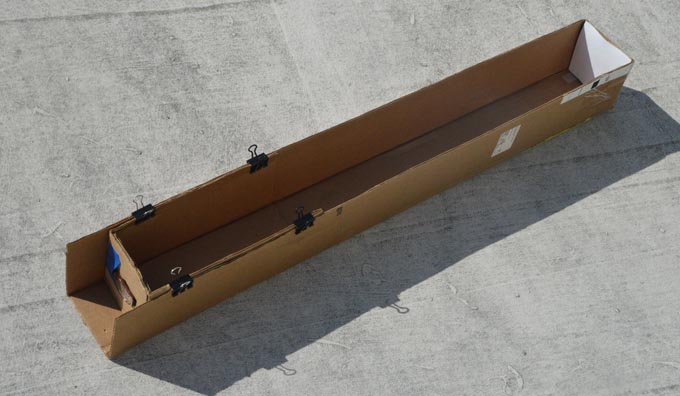
Figure 2a. An SSV using a +1 reading
glass lens mounted in a cardboard box cut down from a
larger one. (See more ideas here on
cutting boxes to make a viewer.) The clips holding
the front of the box can in place can be removed after
checking the image and gluing lens holder in place. The
distance between the the lens and the white screen depends
on the power of the reading glass lens and is given in
Table I above.
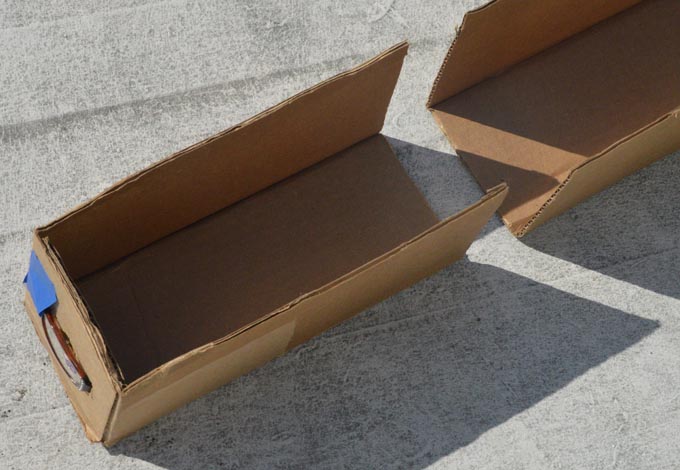
Figure 2b. The original box was 5 by 14 by 56 inches. We kept the 5 inch dimension and ended up with a box 5 by 5 by about 43 inches after we trimmed the box and glued it back together. We trimmed about 10-12 inches from the end of the box and mounted the reading glass lens on the outside of small side of the box. As shown in Figure 2a, the part of the box holding the lens can be slid up and down the box to adjust the distance between the lens and the screen. After the proper position of the lens is established, the lens holder is glued into place and your SSV is complete. Since this viewer was using a +1 one eyeglass, the distance between the lens and the screen was set at 39.4-inches and glued into place.
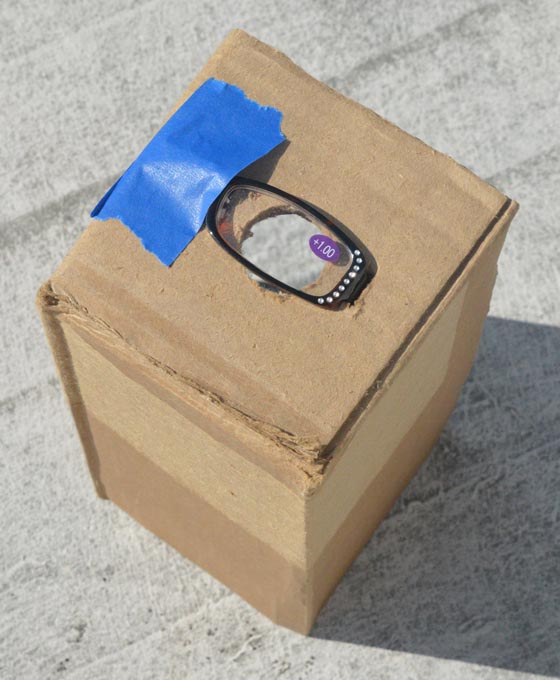 |
Figure 2c. Here we see one of the lenses still in
the frame and taped to the front of the focuser.
It is easy to pop the lens out of the frame if you
wish to mount it in some other way. The hole for
the light should not include the entire lens and
be smaller than the lens. The picture shows an
early test model and the opening is too
large. The best image is formed if the hole
is kept to about a quarter inch or a little more
in size depending on the lens focal length. A
large hole makes an image that is too bright and
indistinct. |
|
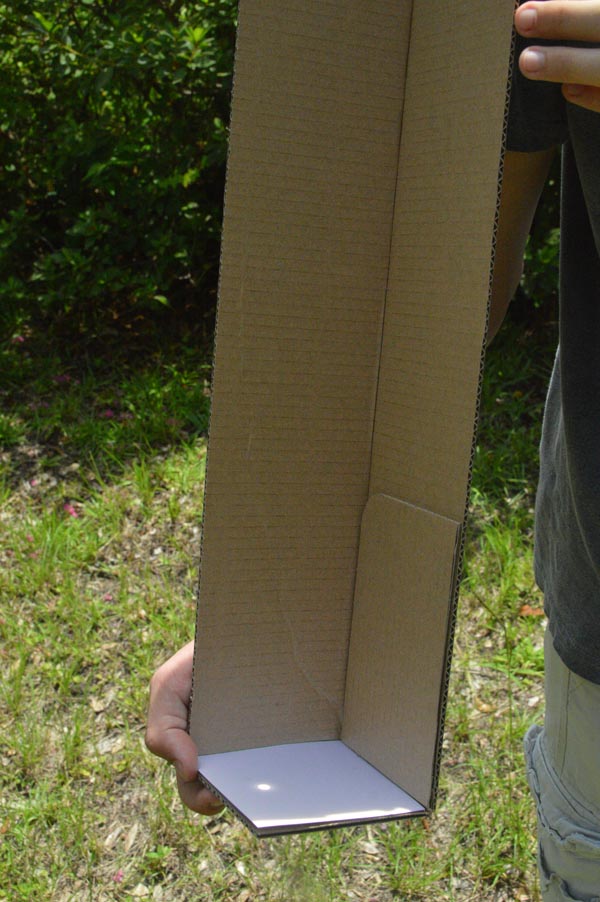
Figure 3a. Here is a 1-lens SSV held on the
observer's shoulder so it can be seen by those
standing around. It is a simple matter to stand
with the Sun at your back and match the shadow of
the box to the viewing screen in order to bring
the sun into view. And with the single lens SSV it
is easy to keep the Sun always in view.
Pictured is an old design with only two side but
we now make them with three sides. This change
makes it difficult for a child to put an eye up to
the lens while it is pointed at the Sun. Removing
the third side from the bottom of the box would
thwart a child's effort and at the same time make
the image easily visible by those standing around
the SSV. |
 |
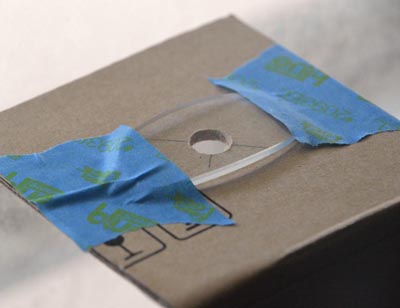 |
Figure 3b Here we show the objective of the 1-lens SSV made with a +1.5 diopter lens. As noted earlier, the hole is deliberately smaller than the lens. Using the full lens produces an excessively bright image that is difficult to view and a small hole (about 1/4 to 3/8 of an inch) produces a sharper image. |
We wish to remind all operators of SSVs that they are not toys and should not be available to youngsters to play with unless they are fully supervised and observed at all times. The 1-lens SSV is probably safer than the 2-lens SSV or a pair of reading glasses that a child could take outside, but still an abundance of caution is needed and is little trouble to accomplish. If the lens is taped on as in Figure 3b, then removing the lens and putting it in the operator's pocket or purse when leaving the viewer unattended, renders it entirely safe. The purpose of the SSV is to permit safe observation with little chance of harm.
We also encourage all makers of SSV to
attach labels warning people not to try to look through
them to look at the Sun and to keep children from do the
same.