| last updated 2/16/24 | |||||||||||||||||||
The Safe Solar Viewer Community Web Pageedited by "TR" Richardson, emeritus
faculty
|
|||||||||||||||||||
|
Introduction
|
|||||||||||||||||||
|
Since the US total solar eclipse of 2017, interest in the little device I called the Safe Solar Viewer (SSV) has increased all over the globe. Leading up to the August 2017 total solar eclipse and afterwords, readers who built these safe solar viewers emailed with improvements and suggestions including an SSV with an adjustable image size, a large image SSV, a 3-D printed SSV and an SSV made from a standard cardboard shipping box. That input has been incorporated into the instructions found on this web site and for that reason I now title this site the web pages of the Safe Solar Viewer Community. These pages provide information anyone
can use for safely viewing the partial phases of a solar
eclipse by projection using inexpensive optics. Some
methods are simple enough for very young children to
construct themselves with some parental help and all
have a modest cost. |
|||||||||||||||||||
|
|
|||||||||||||||||||
 |
|||||||||||||||||||
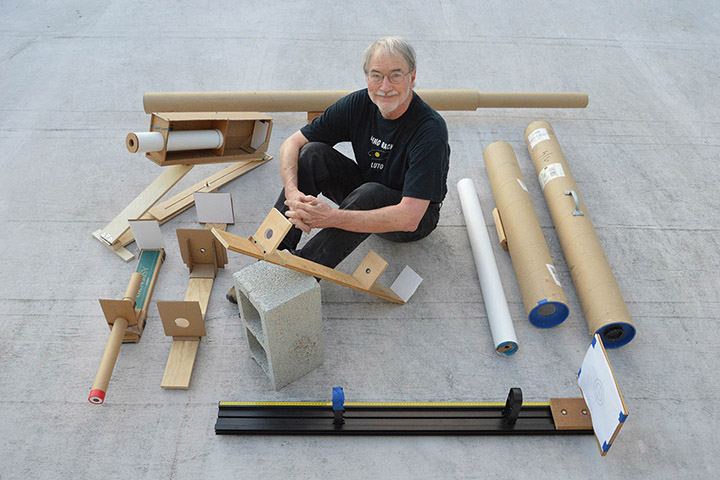
|
Figure 1. Here is the editor of this site with a variety of his simple, inexpensive solar projection devices he has experimented with over the last fifteen years. The 2017 prototype of the 2-lens SSV is in the foreground leaning against the cinder-block. He now teaches kids how to make the SSV using only cardboard and glue, so no wood is needed for the project. (photo credit Maria Mansfield Richardson) |
|||||||||||||||||||
|
I have been working on safe eclipse
viewing methods, especially for young children, since
the US annular eclipse of May 30, 1984. At that time I
was teaching children to make a pinhole projector for
eclipse viewing, but was unsatisfied with both the image
size and image brightness produced by that approach.
Also, I saw children trying to observe the Sun through a
filtered telescope and realized that many of them came
away from the eyepiece not having seen anything at all.
After that experience I was convinced that projection
was the most practical method for children to view a
solar eclipse and I began working on a simple method
that improved on the pinhole solar projector. That
effort culminated in what I called the Safe Solar Viewer
(SSV). My first SSV consisted of a + 0.5
reading glass lens still held in the eye glass frame and
taped over a hole in the end of a 2-meter long carpet
roll tube. It projected a 0.75-inch image of the sun on
wax paper attached to the other end of the tube with a
rubber band. I still remember children who were
captivated by the device grabbing a parent by the hand
and pulling them around to the front of the viewer to
show them the lens in the glasses frame. Something about
that viewer seemed to resonate with kids. Over the years
I worked on developing a simple lens arrangement that
could project a larger image in a shorter distance than
the 2-meter monster, though admittedly it is still my
favorite SSV of all. |
|||||||||||||||||||
|
Eclipse Eye Safety
|
|||||||||||||||||||
|
At the time of a solar eclipse, it is
important to avoid eye damage by using proper observing
techniques during the partial phases of the eclipse.
Many people know it is unsafe to look through a
telescope at the partially eclipsed Sun; however some do
not realize that it is also dangerous to look directly
at the partially eclipsed Sun unless a safe solar filter
or some other technique is employed. Also just because a
filter looks dark does not mean that it is safe for
solar viewing. A material that does not pass visible
light might still allow a great deal of ultraviolet and
infrared light (heat) to pass through to your eye. The
late partial phases of the eclipse magnify this danger
considerably. The American Astronomical Society has a
section of its eclipse observing pages devoted to
information on eye safety. Link One of the safest ways to
view the partial eclipse phases is to project an image
of the Sun onto a white surface and projection has the
advantage of allowing numerous people to observe at the
same time. This web site is dedicated to methods of
solar projection with devices you can make yourself at a
modest cost. |
|||||||||||||||||||
|
General Advice on Making Solar Viewers
|
|||||||||||||||||||
|
These SSVs are simple, easy-to-make
devices. All that is necessary are two (for the 1-lens
SSV) or three (for the 2-lens SSV) upright sheets of
reasonable rigid material that are all approximately
parallel to each other and some means of holding the
upright sheets at the right distance from each other.
Those items and the proper lenses are all that is
necessary. Some SSV builders with a meticulous nature
will work diligently to have the sheets of material as
parallel as possible and they will be rewarded with a
slightly better image. But even if you do not go to such
extremes, you will still have an SSV that projects a
recognizable image of the Sun that will even show the
largest sunspots. Have fun making your SSV. |
|||||||||||||||||||
|
Links to SSV Instructions
|
|||||||||||||||||||
|
If you have a telescope then you should make a Sun Funnel and not a Safe Solar Viewer. It will allow you to safely project a solar image with your telescope. If you don't have a telescope, then make one of our SSVs. At the bottom of this page are the links to the different sections of this site on SSV construction. A link to the original instructions from the 2017 eclipse is included below right for those readers who still find them useful; however, the new designs we now recommend are less expensive to make and simpler to construct. And let us hear from you. We love to see your pictures and will be posting them in a new section. Contact the editor of this site with your problems, questions and successes. Send him an email NOTE: We just
uploaded a new page on the Large Image 2-Lens SSV
(LISSV) and part of the information on the 2-Lens SSV.
We will upload the other
updated pages as we finish them. SSV Pages: |
|||||||||||||||||||
|
|||||||||||||||||||